My Blog List

Showing posts with label Regency Christmas Cards. Show all posts

Thursday, May 31, 2012

La Bell Assemblee, Princess of Wales

I'm having a little trouble scanning these. Even with my "new, improved" scanner. Some of the fashion plates are actually crammed into the binding of the book. I don't think even cutting them out (sacrilege!) would work.

Monday, January 23, 2012

Georgette Heyer: These Old Shades for Valentine's Day

I'm feeling kind of 'meh' today, colors seem washed-out. We had a very pretty snow from last night which meant a "late" day for school. Fun. Then it warmed up a couple of degrees and began drizzling- melted the pretty snow.  So I decided to play around with my favorite Heyer Book Cover, the Pan paperback edition:


"Monseigneur, I would much rather be the last woman then the first."
"Little one," he said very low "since you will stoop to wed me, I pledge you my word that you shall not in the future have cause to regret it."

Friday, January 20, 2012

Photoshop Ice Sculpture

Making A Clear (Ice or Crystal-like)
Object in Photoshop Elements

 1.     Find a picture you’d like to convert.  Like a Regency Mail Coach.

2.    Select & save selected item in foreground, delete background. Best to have individual selections of different parts, such as “selection of horses”, “Selection of Coach WHEELS”, “selection of coach w/o wheels”, “Selection of People”, so you can control the amount and direction of light source.

3.   Use Sharpen filter for details you want to be prominent.  Use “Reduce Noise” filter, and/or eraser to smooth out areas you want to look smooth & icy.

4.   Set your pallet Background Color to Dark Ice-Blue/light blue, or Black/light grey. It doesn’t matter what color is on top of pallets.

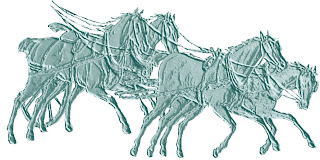
5.    Select objects.  In this case I just selected the horses.


 6.   Go to “Sketch” filter and apply “Bas Relief”, with “detail” at max and the “smoothness” feature adjusted to your preference (about 1/3 of the way up the scale for this picture).  Use “left” or “right” light-source to highlight.  Other light sources (upper left, bottom, etc) don’t seem to work too well.


7.    When you’ve made the whole drawing into a “Bas Relief”, duplicate it 2 times.   Make the 2 top layers invisible.


8.  On your LAYERS Pallet, select the bottom layer (#1) of the Bas Relief Object. Go to the upper right corner of the LAYERS pallet and check “Luminosity” filter. Leave “opacity” at 100% for now.  Later you can adjust it to 75-85% if needed.
 9.   Leave the “Luminosity” layer visible.

10.  Select the layer directly above the “Luminosity” layer (layer 2). 

11. Go to upper right menu on this LAYERS pallet and click on “Screen” if your background is dark.  Slide the opacity scale to about 50% or lower, depending on how much transparent area you want.  This works best with darker backgrounds. This will lighten the already light areas as well as make translucent areas.  If you want completely transparent area you can simply erase or delete the area. 

11b.  If your background will be light, use the "Darken" mode along with adjusting opacity down.


12.  Place a colorful image in the Background.  I chose an old map of England.


13. Here is the stage-coach with a different background:


14.  To add some rainbow-sparkle, SELECT the 3rd (so far unused) stage coach layer.


15. Go to the “Effects” menu/pallet.  Chose a highly   colorful spectrum Effect.  I chose “Nebula” for this sample, tho I don’t think the latest Photoshop Elements has it (I’m still using #6).

 16.  Lower the OPACITY to around 15-25%.  This can go under or over the other stagecoach filters, whichever looks best to you.


So the important filters to use in making an object
translucent are:  Sketch/Bas Relief, "Luminosity" and/or 
"Screen" or "Darken" with very low (about 15%) Opacity.
 After than you can do anything.


Thursday, October 27, 2011

Photoshop Ice Sculpture Instructions... coming (pretty) soon.

Well, crumb! Goggle has made it difficult to post or edit this blog with my current Browser. Hmpf.

I've been busy moving, running around trying to get utilities set up and so on. Didn't have internet connection till a couple of days ago.

I intended to give instructions on how to make the "Ice Sculptures" but when I finally got around to it... I can't remember the exact process!  Why didn't I note them down? I'd got the process to about, hmmm, five or 6 simple steps.  So, I'm re-discovering the whole thing.  Of course I remember most of the steps, but not the order, and I seem to have forgotten something important, that gives the "ice" that translucent and chilly look.  While fooling around last night I found a way to make a really COOL snow-person.

In a couple of days I'll have figured it all out, and simplified it.  I think.

-Kathy

Sunday, September 25, 2011

Regency Christmas Card- Slightly More Christmassy

Regency Christmas Card

And here I have an elegant Regency (actually "Empire" since its a Fashion Print from Costume Parisien) Gentleman.  I'm getting the knack.  Turning the print into "ice" works better if there is a bit less detail in the picture. I've skipped the "3-D" filter but used the "Emboss".  Then there are "Glass" filters and the "Transparency" layer option, along with "screen" and "color burn" layers.


Friday, September 23, 2011

Regency Christmas Card#2, 2011

Original Fashion Print
For this Regency Christmas Card I perused several Photoshop Tutorials on making a picture of an Ice Sculpture... they were either too complicated (30steps!), or the required filter  (3-D filter, scowl :-(  ) wasn't working on my computer.  So I've been "fooling around" switching between the easy Photoshop Elements and the slightly harder Photoshop CS4.  This Ice Sculpture came out quite realistic, I think, though it should be just a little bit more opaque.

I am working on stylizing the Brighton Pavilion background... adding snowflakes, that sort of thing.  Also, I think I'll write down the various steps I used and hope to repeat the process and results!

Ironically, the least realistic item in the picture is the ice cube the lady is posing on- and it is a photo of a real ice cube.

Tuesday, September 6, 2011

Regency Christmas- Snow Globe with Man

This one was fairly easy, as the ice-skating young French Hottie was already done (you can find it elsewhere on this blog).  I'm working on a lady skating, taking another Costume Parisien fashion print and altering it.  I've been working on an "Ice Sculpture" of an Ackermann's Beauty... family says it isn't "icy enough".  So I'm just mulling it over.

Friday, August 26, 2011

Regency Christmas Cards

Let's see... Daughter is doing well, tho experiencing some pain from the 9" scar in her side. Possibly "adhesions". She probably should have had a little post-surgical physical therapy.  She's started school this week, enjoying herself, tried out for a play.

I'm going to make a few more Regency Christmas Cards this year, just for fun and to get back into practice.  I used to do so every year, but dropped off the Almacks list accidentally! and got out of the habit.  This year I'm going to alter a couple of the Costume Parisien plates. Not sure which ones...

I'm open to any requests & suggestions! I'll post the cards at 200dpi, good for downloading.  If anyone wants higher (300) dpi, just send me an email.

Here is a Regency Ice Skating print from Long Ago:

Ice Skating Print from Regency Era, I think.